This is a recipe I came across in a book on bread making. It's simple, to the point, and has awesome, abundant flavor. It's also a whole wheat bread, which helps with flavor, and with glycemic load. The ingredient list is a little more involved than basic white bread, but the process is just as simple.
Ingredients:
-3 Cups all purpose flour, plus extra for kneading
-3 Cups Whole Wheat Flour
-2 Tsp salt
-1 package (or 2 1/4 Tsp) of quick acting dry yeast
-1-2 Tbsp grated lemon peel
-1/4 Cup Honey
-3 Tbsp Shortening (I use Melted butter... no trans-fat issues.)
-2 Tbsp Brown Sugar (for priming)
-2 1/4 Cup of warm water
The only prep work that really needed to be done to an ingredient was to the lemon peel. I saved the peel from the lemon that I squeezed into last night's dinner for the bread I made today. After a day of drying out a bit, I was able to pull out the seeds and the remaining pulp. I cut out the stem and any other undesirable parts, and tossed the rind into the food processor with the mixing blade. I pulsed it a few times to help break it up, and then just left the machine on. The rind bounced around and got cut into hundreds of pieces. Good enough for me.
The first part of the bread making process is something called priming or proofing the yeast. The process is simple: throw the yeast into a glass of warm water, with the brown sugar. Very soon, if the yeast isn't too old, you should see signs of vigorous activity, in the form of foam on top of the mixture. In this case, it took about 10 minutes to get a small pile of foam going.
While the yeast is proofing, mix up the flour and the salt. I used a whisk to blend the two types of flour and the salt together, to make sure that they were evenly mixed. The other reason to do this is to fluff up the flour a little bit, to help it move around and mix well. It makes for a lighter end product, whether it's bread, cookies, or whatever.
Once the yeast is ready, it's time to make the dough. Pour the yeast mixture, the rest of the (Warm) water, the lemon, honey, and melted butter into the mixing bowl with the flour, and mix with a wooden spoon for a minute or two. The dough should come together pretty quickly, and once it's solid enough to work with, it should be dumped out onto a clean, floured work surface, to be kneaded.
Some bread books will advocate adding ingredients slowly as the dough is being mixed. I don't. Mixing the dry ingredients early on ensures that there won't be lumps and pockets of one thing or another. Kneading the dough will help mix everything else in, and there's nothing wrong with kneading the dough for a while if you feel like it. It's a lot easier, and more rewarding, to work with kneadable dough on the counter than it is to mix a sticky mess in a bowl.
Keep the extra flour handy as you're kneading the dough. Keep the dough from sticking to the work surface. As you knead the dough, if you feel like it's too sticky, add some flour. Throw it on the work surface to add it in: the dough will take up what it needs to get to where it needs to be. If the dough is too dry, add a little bit of water. If you've never handled dough before, it takes a bit of time to get a feel for how it "should" be. It should start to feel slightly elastic after a couple of minutes.
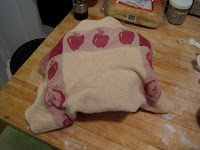
Once the dough has been thoroughly kneaded, (10 minutes or so) roll it into a ball, and cover it with a clean dish towel for the initial rise. I recommend adding a little more flour to the work surface before you do this. Or, if it's cold-ish in your kitchen, (this being October and all) put the dough in a lightly oiled wood or plastic bowl before covering it up. I specify those materials because metal or glass will conduct heat away from the dough and cool it down, which isn't good for bread dough. Let the dough sit for 20 minutes or so. (This is a good opportunity to clean up the tools you used earlier, in particular the mixing bowl, so it doesn't get encrusted with dried out bits of dough.)

After the initial rise, cut the dough in half, knead each piece a little bit, to get out some of the bubbles. This helps mix things up just enough to put the yeast back in touch with new, untapped pockets of food. You may notice that the dough has become more elastic as the gluten chains have formed. Let the dough sit for a minute or two, and then shape each lump into a ball, ("boule," is the bread term) tucking ends and edges underneath. Then set the boules aside, covered, and let them rise at room temperature for an hour or two... the goal is for the dough to double in size. If your kitchen is really warm, keep an eye on the dough; the yeast will be very active, and you don't want the dough to rise too much. Pre-heat the oven to 425 degrees towards the end of the rise.

Once the dough has gone through the second rise, put it on a baking sheet, and put it into the oven. Turn the oven down to 400 degrees, and bake for 30-40 minutes. After this, pull the bread out, and move the loaves from the baking sheet to a cooling rack.
Warm, fresh bread is hard to beat. Even bad home-made bread is generally much better than store-bought. But either way, keep practicing. More practice will help you to learn what dough should feel like, how long it should rise, and give you a sense of what 'normal,' bread making should feel like. Gradual refinements will come with experience, and application of the scientific method. I've read of bakers who record everything: kitchen temperature and humidity, oven temps at various stages of baking, weight of the ingredients and the resulting dough, and so on... and in observing all of these variables, they begin to understand more about what's going on, and what contributes to better bread.


No comments:
Post a Comment