Life is busy sometimes, and it means I've been ignoring the food blog... which isn't to say that I haven't been eating.
Chick pea burgers remain a staple in the home, but I've evolved the recipe.
Ingredient list:
-1 egg
-1/2 yellow onion
-2 tbsp flour
-1/2 tsp chili powder
-1/2 tsp ground cumin
-1/4 tsp salt
-1/2 can chick peas
-1/2 can black beans
-extra light olive oil
-1/2 cup greek yogurt
-1 tbsp tahini
-juice from 1/2 lemon
-1/4 cup thinly sliced celery heart
-sliced beefsteak tomato
-4 whole grain half-pita pockets
Pre-heat a cast iron skillet to just higher than medium heat. Use enough olive oil to coat the entire bottom of the pan.
Throw the egg, flour, salt, spices, and onion into the food processor. Mix until it's a gooey paste. Then dump in the chick peas and black beans and pulse a few times to get a coarse mixture. Mixture should make four patties. Fry in the oil for a few minutes on each side. Thanks to the onion, the patties may start to look almost black. Trust me, they're fine... they actually taste a little better that way. Crispy fried onions and chick peas are wonderful.
While the patties are frying, mix the yogurt, tahini, celery heart, and lemon juice in a bowl to make the sauce for the patties. Lately I've been using the very core of the celery heart for this... it's thin enough and the celery flavor isn't quite as strong, and it's the part of the celery bunch that I never really know what to do with anyway.
Serve in pita with a slice of tomato, and the yogurt sauce. Lately we've been buying the pita from Costco... it's a little smaller, so there's less leftover bread... and, it's cheaper.
Half a can of beans, half an onion, etc... I don't really leave half of two different cans of beans and half an onion typically, I do a second batch to provide lunch for the next day. I usually let it fry while we eat the first batch.
Showing posts with label comfort food. Show all posts
Showing posts with label comfort food. Show all posts
Tuesday, March 15, 2011
Sunday, February 20, 2011
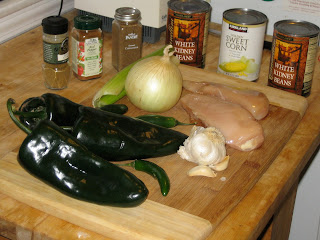
Chicken Chili
Wintertime calls for heat. Heat in the home, and heat in the belly. This is a nice, mild chili that's spicy enough to be cozy, but still painless.
The recipe I started with came from the Food network, and it was ok. But it looked more like a stew than a nice, thick chili. So I modified a bit, and finally came up with a recipe that I like.
Ingredient lists for chili can get to be be pretty long... thankfully this one isn't as involved as some of the other chilis I've seen out there.
 Ingredient list:
1 Onion, chopped
2-3 stalks celery, finely chopped
3 medium poblano peppers, seeded and finely chopped
2-3 jalapeno or serrano peppers, seeded and finely chopped
1 clove garlic
1 tsp ground cumin
1/2 tsp ground coriander
1/4 tsp ground cayenne pepper... or more, to taste.
2 chicken or turkey breasts, cubed, or 1 lb ground turkey
2 cans cannelini beans, rinsed
2 cans sweet corn
2 C chicken broth
2/4 tsp dried oregano
First step, finely chop the peppers, celery, and the onion.
Second step, prepare the meat. The original recipe called for ground turkey, which works, but I wanted a more textured experience, rather than a bowl of mush. I've been using chicken breasts, and rather than cubes, I've been cutting quarter-sized slices. I keep my chicken in the freezer, and when it's time to cook, I thaw them half-way, so they're soft enough to cut through, but firm enough to work with easily. For this recipe, I slice them lengthwise into inch-wide strips, and then chop those down in 1/8" slices. It's a thick enough slice to provide that meaty texture, but it's not so big that it's an effort.
The original recipe was more like a stew than a nice, thick chili. So, to thicken things up, I pour half a can of corn, with the juice, into the food processor with half a can of beans, and the garlic clove, and puree everything.
 To start, pour the olive oil into a dutch oven. (A soup pot will work well if you don't have a dutch oven. If you're in the market for a dutch oven, I recommend looking for an oval shaped one, for reasons I'll get into.) Add the peppers and onions and celery, and cook until soft, which is typically 8-10 minutes.
Add the cumin, coriander, and cayenne, and stir them in until the pot starts to get fragrant... typically another minute or two.
Add the meat, and cook until it's no longer pink. (2-3 minutes, or longer if it's still half-frozen.)
 Add the beans, the pureed mix, the chicken broth, and the oregano. cook for another 25 minutes, partially covered. (This is where the oval pot shines... rotate the lid 90 degrees, and it will still sit solidly on top of the pot. )
After 25 minutes, stir in the corn, and cook for 5 more minutes.
My personal suggestion is to serve this up with some home made corn bread. Yum. (Ariel has been making the corn bread to go with this chili, and it's been fantastic.) Recipe makes around 6 servings, which means it's something you can cook up a pile of and use for lunches during the week. Chili smells great in the microwave, and the yellow and green colors of this particular
The recipe I started with came from the Food network, and it was ok. But it looked more like a stew than a nice, thick chili. So I modified a bit, and finally came up with a recipe that I like.
Ingredient lists for chili can get to be be pretty long... thankfully this one isn't as involved as some of the other chilis I've seen out there.

1 Onion, chopped
2-3 stalks celery, finely chopped
3 medium poblano peppers, seeded and finely chopped
2-3 jalapeno or serrano peppers, seeded and finely chopped
1 clove garlic
1 tsp ground cumin
1/2 tsp ground coriander
1/4 tsp ground cayenne pepper... or more, to taste.
2 chicken or turkey breasts, cubed, or 1 lb ground turkey
2 cans cannelini beans, rinsed
2 cans sweet corn
2 C chicken broth
2/4 tsp dried oregano
First step, finely chop the peppers, celery, and the onion.
Second step, prepare the meat. The original recipe called for ground turkey, which works, but I wanted a more textured experience, rather than a bowl of mush. I've been using chicken breasts, and rather than cubes, I've been cutting quarter-sized slices. I keep my chicken in the freezer, and when it's time to cook, I thaw them half-way, so they're soft enough to cut through, but firm enough to work with easily. For this recipe, I slice them lengthwise into inch-wide strips, and then chop those down in 1/8" slices. It's a thick enough slice to provide that meaty texture, but it's not so big that it's an effort.
The original recipe was more like a stew than a nice, thick chili. So, to thicken things up, I pour half a can of corn, with the juice, into the food processor with half a can of beans, and the garlic clove, and puree everything.

Add the cumin, coriander, and cayenne, and stir them in until the pot starts to get fragrant... typically another minute or two.
Add the meat, and cook until it's no longer pink. (2-3 minutes, or longer if it's still half-frozen.)

After 25 minutes, stir in the corn, and cook for 5 more minutes.
My personal suggestion is to serve this up with some home made corn bread. Yum. (Ariel has been making the corn bread to go with this chili, and it's been fantastic.) Recipe makes around 6 servings, which means it's something you can cook up a pile of and use for lunches during the week. Chili smells great in the microwave, and the yellow and green colors of this particular
Thursday, January 27, 2011
Leftover Soup for a snowy day

We were supposed to get 8-12" of snow last and into this morning, so I'd penciled in today as a snow day, figuring I'd stay home from the shop, and get some writing done. Looking out the window, I think I woke up at 10 to blue skies, and looked out the window to find that we got some of that 8", and then the wind carried the rest away. I got the subtle feeling that I was starting the day as a slacker... this is not un-drivable weather. So, I started reveling in the slacker feeling, and hoping that this weekend's snowstorm won't keep me from being productive. Anyway, around lunchtime, I was looking at food blogs (what else) and got the urge to make soup... again.
 "Baby, we HAVE soup... you made some the other night, remember? Not to mention all the other leftovers?"
 Of course I remembered that we still had soup. But all I could think about was NEW soup. I'm not saying it's logical, but either way, smitten kitchen had a gorgeous picture up of a whole head of garlic that had been used to flavor a pot of soup, and I was damned if I was going to let Sunday night's leftover soup get in the way of trying this out. My impulse control around food when I'm spending the day at home isn't the best... but in this case, the impulse is healthier than normal. I'm cooking healthy soup, not binging on cheese and crackers and chocolate milk. What could be bad about that? I WANT GARLIC!!!
Did I mention that I'd been up for 2 and a half hours and was already on my third cup of coffee?

I started with chopped onions, celery, and scallions, and sent them off to cook in a puddle of olive oil, while I rummaged around for more ingredients. We had leftover mushrooms from making spaghetti sauce... that sounded good. And potatoes... potatoes are good. And garlic... oh, garlic.


Yum.
Sunday, January 23, 2011
Soup and Sandwiches for grown-ups

The basics are simple. Cook the veggies, add the broth, and whatever grains. If you're going to use spices, put them in a tea ball so you can get keep them separate. This last one is pretty important, especially if you plan on storing the leftovers. Things like black pepper can continue to add flavor to the soup, and while it's not necessarily going to taste bad after stewing in the fridge for a day or two, it's not necessarily going to taste good, either, so being able to take the flavoring spices out as part of the process is key.
In this case, I thin sliced a few stalks of celery, sliced some leeks lengthwise and then chopped 1/4" pieces from there, and cut up an onion. Sizzle sizzle sizzle for about 8 minues on medium heat in some oil, and we're ready to go. I poured in a quart and a half of chicken broth, 1/2 cup of wild rice, 1/2 cup of a brown rice medley from Trader Joes, and 1/3 of a cup of barley. No salt, no seasoning, just the veggies, grains and broth. For the vegetarian crowd, you can use veggie broth instead... the rest of this improv dish is veggie friendly, and it's basic enough to be easy.
Bring to a simmer, and keep it there for 35-40 minutes.

Other trivia about this particular pot, Ariel loves teasing me about it. Why? Because it's Rachel Ray branded cookware. Why is that funny? Well... once upon a time, I'd put Rachel Ray on my list of 5. Ariel just couldn't wrap her mind around that one, and laughed at me about it for days. Shortly thereafter, I received this pot. So, to this day, it still puts a smirk on A's face.
Another benefit of making soup... there's time to stop, clean up a bit, and diminish the pile of after dinner dishes. (note the finished meal sitting on a CLEAN butcher block...) Once I was done with the cleaning, I still had time to get going on the sandwiches part. The general idea is an open-face grilled cheese... or maybe it's just over-grown crostini. Either way, it was mighty fine, and the salty savory crunchy cheese and toast thing went very well with the soup.

By the way, if you look closely at the picture, you can see that the back left corner of the cookie sheet is warping upwards, and the whole thing is starting to look like a pringle. It's not a trick of the light, that's actually what was happening. Don't be alarmed if this happens to you... there's something about being that close to the heating element that makes for some interesting thermal expansion issues. Once it cooled off it settles back down.
I still had time after this to clean up the stuff I used to make the grilled cheese before serving dinner. So all we had left to wash were two bowls, two plates, and the soup pot. Not too bad.
Tuesday, January 4, 2011
Sunday morning pancakes

But, as with all things, there was a hitch.
Ariel is hypo-glycemic. Not radically so, but it's a periodic concern. And it's a family thing, too. All of her siblings' significant others have stories about the day they were introduced to Hulk-Smash Persing. When the blood sugars drop below a certain threshold, things can take a turn. And so, it's wise to keep too much processed sugar and white flour out of the mix. This goes for pancakes, too. As her brother Eli put it, "Pancakes for me usually involve a temper tantrum and a nap." So, sourdough pancakes, lovely as they are, were out. So, I decided to experiment a bit.
I'll probably play around with other recipes as I find them, but the version I've settled on for now is, in essence, the basic pancake recipe from the Joy of Cooking, but I substitute different whole-grain flours to fill in some of the white flour content. I also use natural maple syrup instead of sugar. The sugars in maple syrup are different, and more balanced somehow, in a way that I don't understand. I think it has something to do with the fact that maple syrup is just boiled down, and not refined like white sugar.
The first time I made this particular recipe, they were fantastic. And Ariel looked up at me later in the day, smiled, and said "Wow... I still haven't crashed from your pancakes!"
'nuf said.
 Ingredient List
Dry Ingredients:
1/2 Cup white flour
1/2 Cup rye flour
1/2 Cup oat flour
2 tbsp baking powder
1/2 tsp salt
Small handfuls of things like chocolate chips, craisins, finely chopped apple, oatmeal, wheat bran, etc. I've been using oatmeal, chocolate chips and craisins for a while, and I like the flavor.
Wet ingredients:
1 Cup Milk
2 Eggs
2 tbsp light oil (canola, corn, or something else with little or no flavor)
3-4 tbsp maple syrup
Splash of Vanilla or Kahlua
This is for a batch of pancakes that will feed either 4 adults or 2 teenagers. For just us 2, I've been making half-batches.
Start preparing by pre-heating the griddle or frying pan you plan to use. If the pan isn't fully heated when you pour the batter into the pan, the batter won't crisp as well, and will gradually heat up with the pan, instead of being heated quickly by the pan. There's a noticeable difference in texture otherwise.
Mix dry ingredients together, separately from wet ingredients. I do this because it's easier to get everything consistently mixed this way, and because it fluffs up the flour, which helps prevent clumps.


I pour pancakes 4 at a time in the griddle I have. If I'm down to the point where it's not going to be an even 4, I pour whatever batter remains into the griddle into one big pancake. I then announce to any interested parties that the harbinger of breakfast is upon us, and that they should get ready to eat.
Typically, they're already ready.
Friday, December 10, 2010
German apple pancake

This is a great recipe that I found a month or so ago. I've made it a few times, and served it up to a bunch of folks at a brunch that we had at our house a few weeks ago. Among other things, we also served up some thinly sliced kielbasa that we'd fried up in a pan on the stove. Somehow, someone discovered that the two things pair up very well... a great combination of sweet and savory.
The version you see in the photos is a scaled down version for one person, made in a 6" skillet. But the recipe itself, and the portions I'm going to list, are for a 12" skillet.
Ingredient list:
-1/4 stick of butter for the frying pan
-1/4 stick of butter, chopped up, to go into the food processor.
-2-3 apples, cored and cut into small pieces. Use granny smith, or something else that's nice and tart.
-1/2 cup milk
-1/2 cup flour
-4 eggs
-3 tbsp brown sugar to go into the food processor
-1 tsp vanilla
 -1/4 tsp salt
-3 tbsp brown sugar to be sprinkled on the apples
-1/4 tsp ground cinnamon to be sprinkled on the apples
Step one: Pre-heat the oven and the skillet. Turn the oven up to 450, and get hte skillet warmed up to medium-low.

 Step two: Saute the apples in butter. This is pretty simple, really. Butter in pan, apples in butter.
Step three: While the apples are frying up, put the butter, eggs, milk, flour, salt, and vanilla into the food processor to make the batter. (Or mix by hand, your option, but the food processor means I don't have to soften or melt the butter.)
Step four: Once the apples are starting to brown, sprinkle them with brown sugar and cinnamon. Then pour the batter over the apples and move the whole pan into the oven.
Bake at 450 for 12-15 minutes. Serve with powdered sugar, or maple syrup.
Enjoy.
Monday, November 29, 2010
Whole Wheat Banana Bread

I can't tell you how many metric tons of Bananas I've thrown out over the years. I buy a bunch, with best intentions, eat a few when I get home, watch over the course of a few days as they get spotty, and then one day, I notice that they're too soft to eat, and the fruit flies have noticed. The irony inherent in this is, the bananas are almost ready to be made into banana bread at this point... and I've been throwing them away. They're black gold! (ew)
I've been saving over-ripe bananas in the freezer. It's really the best place for it. Right before they're pretty much gone, I freeze them. We came home from the grocery store last night, and I ran out of room in the freezer. So today, I decided, was banana bread day. I pulled the bananas out... and woke up to a puddle of slime on the counter, under some truly black and gnarly ugliness. One of the bananas was so soft inside, the peel had kinked a bit under its own weight, and started to ooze all over the top of the kitchen island. Not exactly what I'd call appetizing. And far beyond what I'd ever considered keeping.

This recipe is adapted from the King Arthur Whole Grain Baking cookbook:
The ingredient list:
-3-4 way over-ripe bananas
-1/2 stick of butter
-1/2 cup packed brown sugar
-1 tsp vanilla extract
-1/2 tsp salt
-1/2 tsp ground cinnamon
-1/4 tsp ground nutmeg
-2 eggs
-3/4 tsp baking soda
-1/4 cup honey
-2 Cup whole wheat flour
The recipe calls for 1/2 cup of walnuts. But I hate walnuts. And the last time I had this bread, it was made by my then-roommate with chocolate chips and craisins. (Seth is clearly a genius) Good enough for me... so I added a fistful of each, as well as a little bit of black strap molasses. (yum)
The recipe calls for a 5x9 loaf pan. I used 2, 5x7 casserole dishes. Whatever your vessel of choice, it needs to be greased. And the oven needs to be pre-heated to 350.
Mix all the liquid and soft ingredients with the sugar and spices until smooth. Then add the flour, chips and craisins. Pour into the dish/ pans/ whatever, and let it sit at 10 minutes at room temperature. Then put into the oven.
 After 50 minutes, cover the loaf/ loaves loosely with aluminum foil. 10-12 minutes later, check with a fork, toothpick, whatever. If the cake-checker-outer comes out clean, the banana bread is done. And if I sound a little punchy, it's because the chocolate has entered my system, and I'm a little giddy.
This is some tasty banana bread. I don't know who came up with the idea of making banana bread. But somebody somewhere decided to fly in the face of all logic and slime-nasty bananas, and at this particular moment, I love this person.
As I write this, the loaves have been out for just under an hour. One of the two is almost gone... two pieces to me, two to Ariel, and one into A's lunch bag.
Saturday, November 27, 2010
Date night! Soup in bread bowls, part 2
So, this was originally going to be cream of sweet potato and peanut soup, but we made a last-minute switch, and made cream of broccoli, instead.
We were also going to do date night on Saturday. We ended up doing it on Monday, instead.
 So, part 2: Cream of broccoli soup, to go in the bread bowls!
The recipe is taken from a soup cookbook that I've had for a while.
-2 pounds (around 4-5 stalks) chopped broccoli. Separate the thick stems, peel them and chop them.
-1 medium onion, chopped.
-1 leek, sliced lengthwise and chopped
-2 celery stalks, chopped
-.25 Cup olive oil.
-1/4 Cup all-purpose flour
-1.5 Qt chicken broth
-.5 cup cream
-.5 tsp dill
-Lemon juice, salt, pepper, to taste
Chop up the vegetables. Don't be too fussy about it, they're all going to go into the blender later, and then get strained. For this reason, it's actually preferable to chop the celery as coarsely as possible... that way the fibers will be strained out more easily. Otherwise, they can get through the straining process, and end up in the final soup. I know, it's just celery. But fibers in a cream soup is really not a good texture. Good cream soup will coat the mouth, and be very comforting. A celery fiber in that context feels almost like a hair.
Cook the vegetables in the olive oil on medium heat, stirring frequently until the onions start to become translucent. (~8 minutes) Then add the flour, and cook for another 4 minutes, still stirring frequently.
Add the broth slowly, and add the dill. Bring to a simmer, and cook for 45 minutes.
The recipe says to strain the liquids. I'm not too fussy about this step. Scoop the vegetables into the blender, hold the lid down, and puree. I typically fill the blender cup half-way, because if the cup is too full, the stirring hot liquid heats up the remaining air, and the pressure pops the lid off a little bit. It's messy.
Puree the soup, and then strain into a new bowl or pot. Season to taste.
--------
And, the money shot: cream of broccoli served in the bread bowls:

The experience was similar to last time. The soup itself is great. So, we each had seconds. And then we started working on the bowls, and felt almost immediately full. My theory is that the dough for the bread bowls is so full of whole grain goodness (oat flour, oatmeal, and oat bran, in particular) that it all swells up almost immediately in the stomach. Neither of us could finish eating the bowls. So, if you're planning a nice dinner for two, my suggestion is to scoop out more of the bread bowls, and leave dinner as a single-serving kind of meal. Alternately, if you're feeding a crowd, use regular bowls for the soup, and serve the bread, cut up into pieces, or crumbled, to put into the soup. The dough will soak up the soup very well, and turn it into a stew-like texture that is very, very filling.
We were also going to do date night on Saturday. We ended up doing it on Monday, instead.

The recipe is taken from a soup cookbook that I've had for a while.
-2 pounds (around 4-5 stalks) chopped broccoli. Separate the thick stems, peel them and chop them.
-1 medium onion, chopped.
-1 leek, sliced lengthwise and chopped
-2 celery stalks, chopped
-.25 Cup olive oil.
-1/4 Cup all-purpose flour
-1.5 Qt chicken broth
-.5 cup cream
-.5 tsp dill
-Lemon juice, salt, pepper, to taste
Chop up the vegetables. Don't be too fussy about it, they're all going to go into the blender later, and then get strained. For this reason, it's actually preferable to chop the celery as coarsely as possible... that way the fibers will be strained out more easily. Otherwise, they can get through the straining process, and end up in the final soup. I know, it's just celery. But fibers in a cream soup is really not a good texture. Good cream soup will coat the mouth, and be very comforting. A celery fiber in that context feels almost like a hair.
Cook the vegetables in the olive oil on medium heat, stirring frequently until the onions start to become translucent. (~8 minutes) Then add the flour, and cook for another 4 minutes, still stirring frequently.
Add the broth slowly, and add the dill. Bring to a simmer, and cook for 45 minutes.
The recipe says to strain the liquids. I'm not too fussy about this step. Scoop the vegetables into the blender, hold the lid down, and puree. I typically fill the blender cup half-way, because if the cup is too full, the stirring hot liquid heats up the remaining air, and the pressure pops the lid off a little bit. It's messy.
Puree the soup, and then strain into a new bowl or pot. Season to taste.
--------
And, the money shot: cream of broccoli served in the bread bowls:

The experience was similar to last time. The soup itself is great. So, we each had seconds. And then we started working on the bowls, and felt almost immediately full. My theory is that the dough for the bread bowls is so full of whole grain goodness (oat flour, oatmeal, and oat bran, in particular) that it all swells up almost immediately in the stomach. Neither of us could finish eating the bowls. So, if you're planning a nice dinner for two, my suggestion is to scoop out more of the bread bowls, and leave dinner as a single-serving kind of meal. Alternately, if you're feeding a crowd, use regular bowls for the soup, and serve the bread, cut up into pieces, or crumbled, to put into the soup. The dough will soak up the soup very well, and turn it into a stew-like texture that is very, very filling.
Monday, October 18, 2010
Chick Pea Burgers
Tonight I was digging through the folder of recipes I've cut out of magazines, and found one that came from Eating Well, for chick pea burgers with Tahini yogurt sauce. Among the ingredients: chick peas, lemon juice, tahini, and olive oil. All of these are found in hummus, which is half of Ariel's answer to the "one food for the rest of your life," question.
(Hummus and Tabouleh, mixed together, are Ariel's favoritest thing. Ever.)
So, already it sounded like a winner.
Update, 11/18/10: In the month since this was originally posted, this recipe has become a staple meal in our home. As a result of getting a lot of practice with this recipe, I've learned a few things, and edited the entry to reflect those lessons.
Ingredient list:
 Chick Pea Burgers
1- can of chick peas, rinsed and drained. (I used to use 19 oz cans, I've since used 14 ox cans without changing anything else, and it works fine.)
4- scallions, trimmed and sliced
1- large egg
2 Tbsp all purpose flour
1 Tbsp chopped fresh oregano. (I used dried from a jar.)
1/2 Tsp ground Cumin. (I love Cumin.)
1/4 Tsp Salt. (Or a heavy pinch, if you don't feel like washing a little pygmy spoon)
2 Tbsp Olive oil. (Bullshit... will explain later)
Tahini Sauce
1/2 Cup- greek style lowfat plain yogurt
2 Tbsp tahini. (Sesame seed paste, you may have to look a bit to find it, but I've been able to find it at supermarkets that I didn't think would have it.)
1 Tbsp Lemon juice. (I just squeezed out a whole lemon.)
1/3 Cup chopped parsley. (More or less. I think mine ended up with a lot more than 1/3 of a cup.)
1/4 Tsp salt. (See above commentary on pygmy spoons.)
Other
2 pita bread pockets, sliced in half lengthwise (Ha... it's circular. You figure out which way is lengthwise...)
1 Beefsteak tomato, sliced
 The egg, scallions, salt, flour, cumin, and oregano go into the food processor with the chick peas. Use the pulse feature, and make a coarse mixture that will form patties well.
edit: Having done this a few times, I can say that it's better to mix the egg, scallions, salt, flour, cumin, and oregano first, and then add the chick peas into the food processor. I used to dump all of the other ingredients on top of the chick peas, and it took a lot longer for those other ingredients to stir down into the mix properly. By the time it was all more or less homogeneous, it was halfway to being pureed. This way the other ingredients are mixed to form the glue that holds everything together, and mixing the chick peas from there results in a coarser mix, and better patties that handle more easily.
For the sauce, combine the sauce ingredients in a bowl and mix with a fork. It's not rocket science.
Next step, make patties with the chick pea mixture, and fry them at medium high in a frying pan, in the olive oil. Be careful when flipping them, as they will come apart pretty easily.
In the ingredient list, the quoted quantity of EVOO is 2 tbsp. This is bullshit, and you should pay it no mind. A more liberal application of oil is required, to help conduct the heat to the patties. For those of you who have a cast iron skillet that can handle 4 patties, I suggest you use it, as cast iron holds heat very well. It's a minor thing, really... frying these things up wasn't hard, but I do have a reason for thinking this.
Generally, I find that foods that are allowed to heat up more gradually do not get that crispy-fried crust on the outside. I've had friends that cooked falafel in aluminum pots, or with not enough oil, and the result was a mess. The aluminum conducts some of the heat away, and the falafel dough (if that's the proper term) cools the oil down even more if there's not enough oil in the pot to compensate. So, the oil didn't stay hot enough to make the falafel balls crust over, and the result was lumpy cooked chick pea paste, in oil.
Using a cast iron skillet to fry these up makes a WORLD of difference. Instead of the slowly building sizzle that I'm used to with our old aluminum and stainless frying pans, the patties start to sizzle the instant they hit the pan. And this instant-frying makes a much crispier outer crust. As a result, I've discovered I actually need less oil.
The patties are served up in the pita pockets with the sauce, and a slice of tomato. Extra pita can be used to help clean up the extra sauce that's typically left over.
This was probably one of the fastest, easiest things to make that I've cooked in a while, and it was really, really good. We'll be making this one again.
(Hummus and Tabouleh, mixed together, are Ariel's favoritest thing. Ever.)
So, already it sounded like a winner.
Update, 11/18/10: In the month since this was originally posted, this recipe has become a staple meal in our home. As a result of getting a lot of practice with this recipe, I've learned a few things, and edited the entry to reflect those lessons.
Ingredient list:

1- can of chick peas, rinsed and drained. (I used to use 19 oz cans, I've since used 14 ox cans without changing anything else, and it works fine.)
4- scallions, trimmed and sliced
1- large egg
2 Tbsp all purpose flour
1 Tbsp chopped fresh oregano. (I used dried from a jar.)
1/2 Tsp ground Cumin. (I love Cumin.)
1/4 Tsp Salt. (Or a heavy pinch, if you don't feel like washing a little pygmy spoon)
2 Tbsp Olive oil. (Bullshit... will explain later)
Tahini Sauce
1/2 Cup- greek style lowfat plain yogurt
2 Tbsp tahini. (Sesame seed paste, you may have to look a bit to find it, but I've been able to find it at supermarkets that I didn't think would have it.)
1 Tbsp Lemon juice. (I just squeezed out a whole lemon.)
1/3 Cup chopped parsley. (More or less. I think mine ended up with a lot more than 1/3 of a cup.)
1/4 Tsp salt. (See above commentary on pygmy spoons.)
Other
2 pita bread pockets, sliced in half lengthwise (Ha... it's circular. You figure out which way is lengthwise...)
1 Beefsteak tomato, sliced

edit: Having done this a few times, I can say that it's better to mix the egg, scallions, salt, flour, cumin, and oregano first, and then add the chick peas into the food processor. I used to dump all of the other ingredients on top of the chick peas, and it took a lot longer for those other ingredients to stir down into the mix properly. By the time it was all more or less homogeneous, it was halfway to being pureed. This way the other ingredients are mixed to form the glue that holds everything together, and mixing the chick peas from there results in a coarser mix, and better patties that handle more easily.
For the sauce, combine the sauce ingredients in a bowl and mix with a fork. It's not rocket science.
Next step, make patties with the chick pea mixture, and fry them at medium high in a frying pan, in the olive oil. Be careful when flipping them, as they will come apart pretty easily.
In the ingredient list, the quoted quantity of EVOO is 2 tbsp. This is bullshit, and you should pay it no mind. A more liberal application of oil is required, to help conduct the heat to the patties. For those of you who have a cast iron skillet that can handle 4 patties, I suggest you use it, as cast iron holds heat very well. It's a minor thing, really... frying these things up wasn't hard, but I do have a reason for thinking this.
Generally, I find that foods that are allowed to heat up more gradually do not get that crispy-fried crust on the outside. I've had friends that cooked falafel in aluminum pots, or with not enough oil, and the result was a mess. The aluminum conducts some of the heat away, and the falafel dough (if that's the proper term) cools the oil down even more if there's not enough oil in the pot to compensate. So, the oil didn't stay hot enough to make the falafel balls crust over, and the result was lumpy cooked chick pea paste, in oil.
Using a cast iron skillet to fry these up makes a WORLD of difference. Instead of the slowly building sizzle that I'm used to with our old aluminum and stainless frying pans, the patties start to sizzle the instant they hit the pan. And this instant-frying makes a much crispier outer crust. As a result, I've discovered I actually need less oil.
The patties are served up in the pita pockets with the sauce, and a slice of tomato. Extra pita can be used to help clean up the extra sauce that's typically left over.
This was probably one of the fastest, easiest things to make that I've cooked in a while, and it was really, really good. We'll be making this one again.
 |
| One very happy nursing student. |
Thursday, September 30, 2010
Spaghetti dinner
I remember being astonished by friends in college who didn't understand how to make decent spaghetti. They thought you just boiled the pasta, and dumped the sauce out of the jar.
I think the sauce should be a meal unto itself. Piles of veggies and meat, and forkfuls of flavor. Friday night was spaghetti night when I went to visit my dad on weekends as a kid. And his sauce was basically 2 pounds of hamburger with some garlic, tomato paste and bay leaves. Yummy stuff, and it quickly became comfort food for me.
Ariel made something similar for me a year or two into our relationship. That night is still a memorable one, and looking back, I think it probably helped seal the deal for me.
Tonight I made spaghetti sauce, twice. Once for dinner, and another batch in the crock pot for the rest of the week.
-------------------------
The basics for good pasta sauce for me have always been pretty simple. You need a good base, good veggies, and meat. Over time, my list of veggies has expanded, and the process I use to cook everything has, too. I use store bought sauce as a base, since it's already pretty well seasoned, and it comes with a jar, which is great for storing leftover sauce. Given the amount of other ingredients that get added in, it's not uncommon for me to cook dinner, and have enough sauce left over to fill the whole jar, which can then go in either the fridge or freezer.
Basic ingredients:
 -Store bought spaghetti sauce
-Onions
-Garlic
-Scallions
-Bell peppers
-Tomatoes
-White mushrooms
-Green olives
-Bay leaves
-Tabasco sauce
-Chili powder
-Black Pepper
 The process has typically been the same for me: cut up the veggies and throw them in the frying pan with some oil. Recently I started throwing some of them into the food processor with the mixing blade, because it chops them up much finer, which means they cook faster, and mix more evenly into the rest of the sauce. So, tonight I threw half green bell pepper, half of a beefsteak tomato, 2 scallions, a few garlic cloves, a handful of white mushrooms, half of a fresh jalapeno pepper, and a half-dozen green olives into the food processor, and mixed them up using the pulse button. It helps to use the pulse button so that the stuff on top doesn't float while the stuff on the bottom gets turned into juice. The result looked vaguely like relish. The mixture went right into the frying pan with some oil.

Next thing to go through the cuisinart was a couple of onions, chopped into chunks just small enough to go through the chute, to get sliced up. The sliced onion went into the pan, and got mixed up with the veg mix. I browned some sweet and hot Italian sausages, and chopped them up to go into the pan. I finished the whole mess by adding half a jar of store bought sauce, a few bay leaves, some tabasco, and some chili powder. I let that simmer for 5 or 10 minutes before starting to boil water for pasta.
 One tip for simmering sauce: for years, I ignored the wisdom of using a screen to go over the frying pan. Given that I was a young man in his early 20's who didn't worry too much about things, the result was a perpetually messy stove top. It's still a little messy now, but it's much better than it was, and the use of the screen has helped tremendously.
By the time the pasta was fully cooked, the sauce was finished. Total time for the whole meal was something just under an hour, 30-40 minutes of which was spent actively cooking.

I think the sauce should be a meal unto itself. Piles of veggies and meat, and forkfuls of flavor. Friday night was spaghetti night when I went to visit my dad on weekends as a kid. And his sauce was basically 2 pounds of hamburger with some garlic, tomato paste and bay leaves. Yummy stuff, and it quickly became comfort food for me.
Ariel made something similar for me a year or two into our relationship. That night is still a memorable one, and looking back, I think it probably helped seal the deal for me.
Tonight I made spaghetti sauce, twice. Once for dinner, and another batch in the crock pot for the rest of the week.
-------------------------
The basics for good pasta sauce for me have always been pretty simple. You need a good base, good veggies, and meat. Over time, my list of veggies has expanded, and the process I use to cook everything has, too. I use store bought sauce as a base, since it's already pretty well seasoned, and it comes with a jar, which is great for storing leftover sauce. Given the amount of other ingredients that get added in, it's not uncommon for me to cook dinner, and have enough sauce left over to fill the whole jar, which can then go in either the fridge or freezer.
Basic ingredients:

-Onions
-Garlic
-Scallions
-Bell peppers
-Tomatoes
-White mushrooms
-Green olives
-Bay leaves
-Tabasco sauce
-Chili powder
-Black Pepper


Next thing to go through the cuisinart was a couple of onions, chopped into chunks just small enough to go through the chute, to get sliced up. The sliced onion went into the pan, and got mixed up with the veg mix. I browned some sweet and hot Italian sausages, and chopped them up to go into the pan. I finished the whole mess by adding half a jar of store bought sauce, a few bay leaves, some tabasco, and some chili powder. I let that simmer for 5 or 10 minutes before starting to boil water for pasta.

By the time the pasta was fully cooked, the sauce was finished. Total time for the whole meal was something just under an hour, 30-40 minutes of which was spent actively cooking.

Subscribe to:
Comments (Atom)